如果你的心裏只有一件事。
請問:是不是學習?
Google希望你是,而且還準備扶上馬,再送一程。
所以今天一早,大禮包又來了。

手把手教你
今年春天,Google發佈了機器學習速成課,英文簡稱MLCC。而且這套基本全程都有中文的課程,還是完全免費的。

這還不夠。
Google覺得光學理論還不夠,必須教你理論與實戰相結合。
所謂:知行合一。
於是,Google發佈了最新的一套課程:Machine Learning Practica(機器學習實踐)。這套課程會示範Google如何在產品中使用機器學習。

課程地址在此:
https://developers.google.com/machine-learning/practica/
(.cn域名地址親測可用)
與之前的課程不同,這套動手實踐課程中,包括視頻、文檔和交互式編程練習。目前已經上線的第一課是圖像分類。
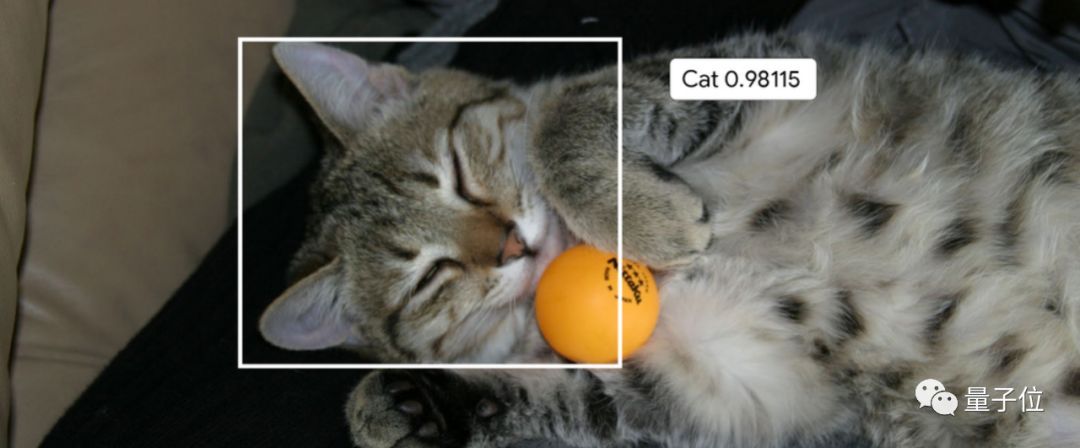
在圖像分類的實踐課程中,可以學習Google如何開發利用最先進的圖像分類模型,這也是Google相冊背後的核心技術。
迄今爲止,已有超過1萬名Google員工利用這個實踐課程來訓練他們自己的圖像分類器,最終實現可以識別照片中的貓貓狗狗。
課前準備
想要學習這套課程,也有一些基礎要求。
主要是兩點:
- 學過Google機器學習速成課,或者瞭解機器學習的基本概念
- 有不錯的編程基礎知識,以及有一些Python編程經驗
這套實踐課程使用了Keras API。以及課程中的編程練習,使用了Colab。使用Colab不要求之前有過Keras經驗。
課程中代碼基本可算是提供了逐步的解釋。
目前這套實踐課程只發布了圖像分類一組,但Google表示更多的實踐課程正在:骯!嘖!味!
課程簡介
在這個課程中,Google首先介紹了圖像分類的基本原理,講述了卷積神經網絡(CNN)的構建,以及池化、全連接等概念。
然後,Google會引導你從頭開始構建一個CNN網絡,並且學習如何防止過擬合,以及利用訓練模型進行特徵提取和微調。
實踐課程一共包括三組練習,分別是:
- Exercise 1: Build a Convnet for Cat-vs-Dog Classification
帶你構建一個貓狗分類的卷積網絡。 - Exercise 2: Preventing Overfitting
教你如何防止過擬合,改善提高CNN模型。 - Exercise 3: Feature Extraction and Fine-Tuning
教你如何通過特徵提取和微調來使用Google的Inception v3模型,併爲上面兩個練習完成的分類器獲取更好的準確性。
課程示範
量子位潛入這個課程內部,帶回了第二個實踐練習。在這堂課裏,谷歌想教會大家在貓狗圖像分類中,如何減少過擬合。大家感受一下——

練習2:減少過擬合
預計完成時間:30分鐘
在本節練習中,我們將基於在練習1中創建的模型將貓狗分類,並通過一些策略減少過擬合:也就是數據增強(Data Augmentation)和正則化方法dropout,從而提高準確性。
和長頸鹿被關進冰箱一樣,這得分四步走:
- 通過對訓練圖像進行隨機轉換,來探索數據增強的玩法
- 在我們數據處理的過程中應用數據增強
- 在轉換中加入dropout
- 重新訓練模型,評估損失和精確度
Let’s get started吧!

數據增強の探索
數據增強是減少視覺模型過擬合的基本方法了,因爲我們手頭的訓練實例爲數不多,爲了充分利用,我們可通過一些隨機的變換「增強」它們,對模型來說,這是不同的圖像~
這可以通過在ImageDataGenerator實例讀取的圖像上增加一些隨機轉換來實現,比如:
1 from keras.preprocessing.image import ImageDataGenerator 2 3 datagen = ImageDataGenerator( 4 rotation_range=40, 5 width_shift_range=0.2, 6 height_shift_range=0.2, 7 shear_range=0.2, 8 zoom_range=0.2, 9 horizontal_flip=True, 10 fill_mode='nearest')
還有一些可用的選擇:
- rotation_range是在0-180之間的一個值,可在此角度內隨機旋轉圖片。
- width_shift和height_shift是個範圍,指的總寬度或高度的一部分,圖像可在此範圍內垂直或水平隨機轉換。
- shear_range用於隨機剪切。
- zoom_range用來隨機縮放圖片的。
- horizontal_flip用於水平隨機翻轉圖像的一半。
- fill_mode是用來填充新創造的像素,在圖像隨機垂直或水平變換後可能用到
注意:此練習中使用的2000張圖片摘自Kaggle上的「狗vs貓」數據集,包含25000張圖片。爲了節約訓練時間,這裏我們只用到其中的一個子集。
1 !wget --no-check-certificate \ 2 https://storage.googleapis.com/mledu-datasets/cats_and_dogs_filtered.zip -O \ 3 /tmp/cats_and_dogs_filtered.zip
1 import os 2 import zipfile 3 4 local_zip = '/tmp/cats_and_dogs_filtered.zip' 5 zip_ref = zipfile.ZipFile(local_zip, 'r') 6 zip_ref.extractall('/tmp') 7 zip_ref.close() 8 9 base_dir = '/tmp/cats_and_dogs_filtered' 10 train_dir = os.path.join(base_dir, 'train') 11 validation_dir = os.path.join(base_dir, 'validation') 12 13 # Directory with our training cat pictures 14 train_cats_dir = os.path.join(train_dir, 'cats') 15 16 # Directory with our training dog pictures 17 train_dogs_dir = os.path.join(train_dir, 'dogs') 18 19 # Directory with our validation cat pictures 20 validation_cats_dir = os.path.join(validation_dir, 'cats') 21 22 # Directory with our validation dog pictures 23 validation_dogs_dir = os.path.join(validation_dir, 'dogs') 24 25 train_cat_fnames = os.listdir(train_cats_dir) 26 train_dog_fnames = os.listdir(train_dogs_dir)
接下來,我們將datagen轉換應用到訓練集裏的貓咪圖像,生成5個隨機變量。這個單元需多運行幾次,找到新批次中的隨機變量。
1 %matplotlib inline 2 3 import matplotlib.pyplot as plt 4 import matplotlib.image as mpimg 5 6 from keras.preprocessing.image import array_to_img, img_to_array, load_img 7 8 img_path = os.path.join(train_cats_dir, train_cat_fnames[2]) 9 img = load_img(img_path, target_size=(150, 150)) # this is a PIL image 10 x = img_to_array(img) # Numpy array with shape (150, 150, 3) 11 x = x.reshape((1,) + x.shape) # Numpy array with shape (1, 150, 150, 3) 12 13 # The .flow() command below generates batches of randomly transformed images 14 # It will loop indefinitely, so we need to `break` the loop at some point! 15 i = 0 16 for batch in datagen.flow(x, batch_size=1): 17 plt.figure(i) 18 imgplot = plt.imshow(array_to_img(batch[0])) 19 i += 1 20 if i % 5 == 0: 21 break
在數據處理過程中應用數據增強
現在,將上述增強的數據應用到數據預處理配置中——
1 # Adding rescale, rotation_range, width_shift_range, height_shift_range, 2 # shear_range, zoom_range, and horizontal flip to our ImageDataGenerator 3 train_datagen = ImageDataGenerator( 4 rescale=1./255, 5 rotation_range=40, 6 width_shift_range=0.2, 7 height_shift_range=0.2, 8 shear_range=0.2, 9 zoom_range=0.2, 10 horizontal_flip=True,) 11 12 # Note that the validation data should not be augmented! 13 test_datagen = ImageDataGenerator(rescale=1./255) 14 15 # Flow training images in batches of 32 using train_datagen generator 16 train_generator = train_datagen.flow_from_directory( 17 train_dir, # This is the source directory for training images 18 target_size=(150, 150), # All images will be resized to 150x150 19 batch_size=20, 20 # Since we use binary_crossentropy loss, we need binary labels 21 class_mode='binary') 22 23 # Flow validation images in batches of 32 using test_datagen generator 24 validation_generator = test_datagen.flow_from_directory( 25 validation_dir, 26 target_size=(150, 150), 27 batch_size=20, 28 class_mode='binary')
神奇之處是,若用增強的數據來訓練模型,則不會被認爲是相同示例(雖然它們都是從一張圖片上得到的)。不過模型眼中這些輸入仍緊密相關的,所以還不足以完全消除過擬合。
加入Dropout
不過~還有另外一種流行的策略能減少過擬合,即dropout。
如果你想了解過擬合的基本概念,這裏自賣自誇推薦兩個之前免費課程中的相關介紹:
https://developers.google.com/machine-learning/crash-course/training-neural-networks/video-lecture
https://developers.google.com/machine-learning/crash-course/
我們從練習1重新配置我們的convnet架構,在最後的分類層前試圖添加一些dropout。
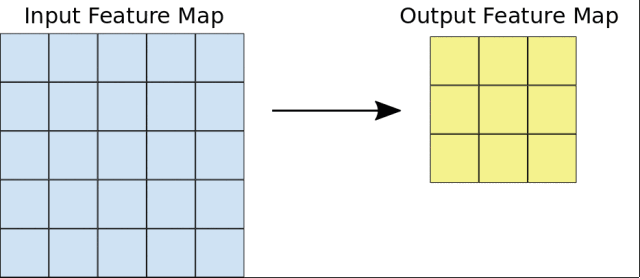
1 from keras.models import Model 2 from keras import layers 3 from keras.optimizers import RMSprop 4 from keras import backend as K 5 6 import tensorflow as tf 7 8 # Configure the TF backend session 9 tf_config = tf.ConfigProto( 10 gpu_options=tf.GPUOptions(allow_growth=True)) 11 K.set_session(tf.Session(config=tf_config)) 12 13 # Our input feature map is 150x150x3: 150x150 for the image pixels, and 3 for 14 # the three color channels: R, G, and B 15 img_input = layers.Input(shape=(150, 150, 3)) 16 17 # First convolution extracts 16 filters that are 3x3 18 # Convolution is followed by max-pooling layer with a 2x2 window 19 x = layers.Conv2D(16, 3, activation='relu')(img_input) 20 x = layers.MaxPooling2D(2)(x) 21 22 # Second convolution extracts 32 filters that are 3x3 23 # Convolution is followed by max-pooling layer with a 2x2 window 24 x = layers.Conv2D(32, 3, activation='relu')(x) 25 x = layers.MaxPooling2D(2)(x) 26 27 # Third convolution extracts 64 filters that are 3x3 28 # Convolution is followed by max-pooling layer with a 2x2 window 29 x = layers.Convolution2D(64, 3, activation='relu')(x) 30 x = layers.MaxPooling2D(2)(x) 31 32 # Flatten feature map to a 1-dim tensor 33 x = layers.Flatten()(x) 34 35 # Create a fully connected layer with ReLU activation and 512 hidden units 36 x = layers.Dense(512, activation='relu')(x) 37 38 # Add a dropout rate of 0.5 39 x = layers.Dropout(0.5)(x) 40 41 # Create output layer with a single node and sigmoid activation 42 output = layers.Dense(1, activation='sigmoid')(x) 43 44 # Configure and compile the model 45 model = Model(img_input, output) 46 model.compile(loss='binary_crossentropy', 47 optimizer=RMSprop(lr=0.001), 48 metrics=['acc'])
重新訓練模型
隨着數據的增加和dropout的填入,我們需要重新訓練convnet模型。
這一次,我們訓練全部的2000張圖片,訓練了30輪,並對驗證了所有的1000個測試圖像。
這可能需要幾分鐘的時間,檢驗一下你是否能自己編寫代碼了。
1 # WRITE CODE TO TRAIN THE MODEL ON ALL 2000 IMAGES FOR 30 EPOCHS, AND VALIDATE 2 # ON ALL 1,000 TEST IMAGES評估結果
接下來,我們用數據增強和dropout評估模型訓練的結果。
1 # Retrieve a list of accuracy results on training and test data 2 # sets for each training epoch 3 acc = history.history['acc'] 4 val_acc = history.history['val_acc'] 5 6 # Retrieve a list of list results on training and test data 7 # sets for each training epoch 8 loss = history.history['loss'] 9 val_loss = history.history['val_loss'] 10 11 # Get number of epochs 12 epochs = range(len(acc)) 13 14 # Plot training and validation accuracy per epoch 15 plt.plot(epochs, acc) 16 plt.plot(epochs, val_acc) 17 plt.title('Training and validation accuracy') 18 19 plt.figure() 20 21 # Plot training and validation loss per epoch 22 plt.plot(epochs, loss) 23 plt.plot(epochs, val_loss) 24 plt.title('Training and validation loss')
結果不錯!模型已經不再過擬合。
事實上,從我們的訓練資料來看,隨着訓練次數的增加,模型的準確度會達到80%!
清理
在運行練習3之前,我們還需要運行以下單元來釋放kernel和空閒的內存資源:
1 import os, signal 2 os.kill(os.getpid(), signal.SIGKILL)One More Thing
不知道是不是忙中出錯,Google這套全新的課程,在我們發稿的時候,遇到了一個尷尬的問題:練習課程無法訪問。
你點擊練習之後,原本應該是轉入一個Colab頁面,但是卻把多數用戶擋在一個這樣的界面之上。如圖:

鏈接地址:https://login.corp.google.com
這是啥?
其實,這就是大名鼎鼎的moma,一個Google內部的搜索工具。如果你是Google員工,就能登錄訪問,進入Google內網。
可能是因爲這套實踐課程,和MLCC一樣,也是之前面向Google內部的課程,所以出現了現在略微尷尬的一幕。
估計,可能很快會修復這個問題。
所以你可以先看看上面量子位搬運的課程示範。