本文介紹瞭如何使用 TensorFlow 在智能機上(包括安卓和 iOS 設備)執行實時單人姿態估計。
GitHub 地址:https://github.com/edvardHua/PoseEstimationForMobile
該 repo 使用 TensorFlow 實現 CPM 和 Hourglass 模型。這裏未使用常規的卷積,而是在模型內部使用了反向卷積(又叫 Mobilenet V2),以便執行實時推斷。
注:你可以修改網絡架構,來訓練更高 PCKh 的模型。架構地址:https://github.com/edvardHua/PoseEstimationForMobile/tree/master/training/src
該庫包含:
訓練 CPM 和 Hourglass 模型的代碼;
安卓 demo 的源代碼;
IOS demo 的源代碼。
下面的 gif 是在 Mi Mix2s 上截取的(~60 FPS)

你可以下載以下 apk,在自己的設備上進行測試。

PoseEstimation-Mace.apk:https://raw.githubusercontent.com/edvardHua/PoseEstimationForMobile/master/release/PoseEstimation-Mace.apk
PoseEstimation-TFlite.apk:https://raw.githubusercontent.com/edvardHua/PoseEstimationForMobile/master/release/PoseEstimation-TFlite.apk
訓練
依賴項
Python3
TensorFlow >= 1.4
Mace
數據集
訓練數據集:https://drive.google.com/open?id=1zahjQWhuKIYWRRI2ZlHzn65Ug_jIiC4l
將其解壓縮,獲取以下文件結構:
# root @ ubuntu in ~/hdd/ai_challenger$ tree -L 1 ..├── ai_challenger_train.json├── ai_challenger_valid.json├── train└── valid該訓練數據集僅包含單人圖像,數據來源是 AI Challenger 競賽。共包含 22446 個訓練樣本和 1500 個測試樣本。
該 repo 作者使用 tf-pose-estimation 庫中的數據增強代碼將標註遷移爲 COCO 格式。tf-pose-estimation 庫:https://github.com/ildoonet/tf-pose-estimation
超參數
訓練步驟中,使用 experiments 文件夾中的 cfg 文件傳輸超參數。
以下是 mv2_cpm.cfg 文件的內容:
[Train]model: 'mv2_cpm'checkpoint: Falsedatapath: '/root/hdd/ai_challenger'imgpath: '/root/hdd/'visible_devices: '0, 1, 2'multiprocessing_num: 8max_epoch: 1000lr: '0.001'batchsize: 5decay_rate: 0.95input_width: 192input_height: 192n_kpoints: 14scale: 2modelpath: '/root/hdd/trained/mv2_cpm/models'logpath: '/root/hdd/trained/mv2_cpm/log'num_train_samples: 20000per_update_tensorboard_step: 500per_saved_model_step: 2000pred_image_on_tensorboard: True該 cfg 文件覆蓋模型的所有參數,在 network_mv2_cpm.py 中仍有一些參數。
使用 nvidia-docker 訓練
通過以下命令構建 docker:
cd training/dockerdocker build -t single-pose .或者
docker pull edvardhua/single-pose然後運行以下命令,訓練模型:
nvidia-docker run -it -d \-v <dataset_path>:/data5 -v <training_code_path>/training:/workspace \-p 6006:6006 -e LOG_PATH=/root/hdd/trained/mv2_cpm/log \-e PARAMETERS_FILE=experiments/mv2_cpm.cfg edvardhua/single-pose此外,它還在 port 6006 上創建了 tensorboard。確保安裝了 nvidia-docker。
按一般方法訓練
1. 安裝依賴項:
cd trainingpip3 install -r requirements.txt還需要安裝 cocoapi (https://github.com/cocodataset/cocoapi)。
2. 編輯 experiments 文件夾中的參數文件,它包含幾乎所有超參數和訓練中需要定義的其他配置。之後,傳輸參數文件,開始訓練:
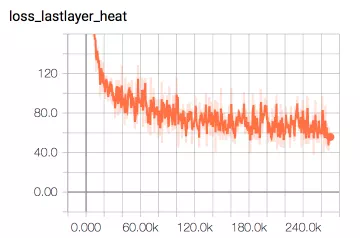
cd trainingpython3 src/train.py experiments/mv2_cpm.cfg在 3 張英偉達 1080Ti 顯卡上經過 12 個小時的訓練後,該模型幾乎收斂。以下是對應的 tensorboard 圖。
基準(PCKh)
運行以下命令,評估 PCKh 值。
python3 src/benchmark.py --frozen_pb_path=hourglass/model-360000.pb \--anno_json_path=/root/hdd/ai_challenger/ai_challenger_valid.json \--img_path=/root/hdd \--output_node_name=hourglass_out_3預訓練模型
CPM:https://github.com/edvardHua/PoseEstimationForMobile/tree/master/release/cpm_model
Hourglass:https://github.com/edvardHua/PoseEstimationForMobile/tree/master/release/hourglass_model
安卓 demo
由於 mace 框架,你可以使用 GPU 在安卓智能機上運行該模型。
按照以下命令將模型轉換爲 mace 格式:
cd <your-mace-path># You transer hourglass or cpm model by changing `yml` file.python tools/converter.py convert --config=<PoseEstimationForMobilePath>/release/mace_ymls/cpm.yml然後根據 mace 文檔的說明,將模型集成到安卓設備中。
至於如何調用模型、解析輸出,可以參見安卓源代碼:https://github.com/edvardHua/PoseEstimationForMobile/tree/master/android_demo。
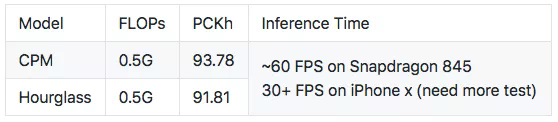
一些芯片的平均推斷時間基準如下所示:

以下是該 repo 作者構建該 demo 的環境:
操作系統:macOS 10.13.6(mace 目前不支持 windows)
Android Studio:3.0.1
NDK 版本:r16
在構建 mace-demo 時,不同環境可能會遇到不同的錯誤。爲避免這種情況,作者建議使用 docker。
docker pull registry.cn-hangzhou.aliyuncs.com/xiaomimace/mace-dev-litedocker run -it --privileged -d --name mace-dev --net=host -v to/you/path/PoseEstimationForMobile/android_demo/demo_mace:/demo_mace registry.cn-hangzhou.aliyuncs.com/xiaomimace/mace-dev-litedocker run -it --privileged -d --name mace-dev --net=host \ -v to/you/path/PoseEstimationForMobile/android_demo/demo_mace:/demo_mace \ registry.cn-hangzhou.aliyuncs.com/xiaomimace/mace-dev-lite# Enter to dockerdocker exec -it mace-dev bash# Exec command inside the dockercd /demo_mace && ./gradlew build或者將模型轉換爲 tflite:
# Convert to frozen pb.cd trainingpython3 src/gen_frozen_pb.py \--checkpoint=<you_training_model_path>/model-xxx --output_graph=<you_output_model_path>/model-xxx.pb \--size=192 --model=mv2_cpm_2# If you update tensorflow to 1.9, run following command.python3 src/gen_tflite_coreml.py \--frozen_pb=forzen_graph.pb \--input_node_name='image' \--output_node_name='Convolutional_Pose_Machine/stage_5_out' \--output_path='./' \--type=tflite # Convert to tflite.# See https://github.com/tensorflow/tensorflow/blob/master/tensorflow/docs_src/mobile/tflite/devguide.md for more information.bazel-bin/tensorflow/contrib/lite/toco/toco \--input_file=<you_output_model_path>/model-xxx.pb \--output_file=<you_output_tflite_model_path>/mv2-cpm.tflite \--input_format=TENSORFLOW_GRAPHDEF --output_format=TFLITE \--inference_type=FLOAT \--input_shape="1,192,192,3" \--input_array='image' \--output_array='Convolutional_Pose_Machine/stage_5_out'然後,將 tflite 文件放在 android_demo/app/src/main/assets 中,修改 ImageClassifierFloatInception.kt 中的參數。
............// parameters need to modify in ImageClassifierFloatInception.kt/** * Create ImageClassifierFloatInception instance * * @param imageSizeX Get the image size along the x axis. * @param imageSizeY Get the image size along the y axis. * @param outputW The output width of model * @param outputH The output height of model * @param modelPath Get the name of the model file stored in Assets. * @param numBytesPerChannel Get the number of bytes that is used to store a single * color channel value. */ fun create( activity: Activity, imageSizeX: Int = 192, imageSizeY: Int = 192, outputW: Int = 96, outputH: Int = 96, modelPath: String = "mv2-cpm.tflite", numBytesPerChannel: Int = 4 ): ImageClassifierFloatInception = ImageClassifierFloatInception( activity, imageSizeX, imageSizeY, outputW, outputH, modelPath, numBytesPerChannel)............最後,將該項目導入 Android Studio,在智能機設備上運行。
iOS Demo
首先,將模型轉換爲 CoreML 模型:
# Convert to frozen pb.cd trainingpython3 src/gen_frozen_pb.py \--checkpoint=<you_training_model_path>/model-xxx --output_graph=<you_output_model_path>/model-xxx.pb \--size=192 --model=mv2_cpm_2# Run the following command to get mlmodelpython3 src/gen_tflite_coreml.py \--frozen_pb=forzen_graph.pb \--input_node_name='image' \--output_node_name='Convolutional_Pose_Machine/stage_5_out' \--output_path='./' \--type=coreml然後,按照 PoseEstimation-CoreML 中的說明來操作(https://github.com/tucan9389/PoseEstimation-CoreML)。