選自baptiste-wicht
參與:劉曉坤、蔣思源
Baptiste Wicht公佈了自己編寫的深度學習庫DLL1.0,可以通過C++接口使用。文中通過幾個例子介紹了DLL調用全連接網絡、DNN的能力,並通過實驗和其它流行框架如TensorFlow、Keras、Torch和Caffe作了綜合性能比較。
很高興公佈深度學習庫 Deep Learning Library(DLL)1.0 的第一個版本。DLL 是一個神經網絡庫,致力於提供快速和易用的使用體驗。
項目地址:https://github.com/wichtounet/dll
我從四年前爲完成 Ph.D. 論文而開始搭建這個庫。我需要一個好用的庫來訓練和使用受限玻爾茲曼機(RBMs),而當時並沒有這樣的條件。因此,我決定自己編寫。現在它能很完美的支持 RBM 和卷積 RBM(CRBM)模型。RBMs(或深度信念網絡,DBNs)的堆棧可以用對比分歧(Contrastive Divergence)預訓練,然後用 mini-batch 梯度下降或共軛梯度法進行微調,或者直接作爲特徵提取器。經過多年發展,該庫已經擴展到可以處理人工神經網絡(ANNs)和卷積神經網絡(CNNs)了。其中網絡還可以訓練常規的自動編碼器。還能使用多種高級層比如 Dropout 或 Batch 正則化,以及自適應學習率技術比如 Adadelta 和 Adam。這個庫還能集成支持這幾個數據集:MNIST,CIFAR-10 和 ImageNet。
這個庫可以通過 C++接口使用,完全的僅有標頭檔(fully header-only),需要 C++14 編譯器,即至少需要 clang3.9 或 GCC6.3。
調用案例
我們先看看下面這個使用庫的例子:
#include "dll/neural/dense_layer.hpp"
#include "dll/network.hpp"
#include "dll/datasets.hpp"
intmain(int/*argc*/,char*/*argv*/[]){
// Load the dataset
autodataset =dll::make_mnist_dataset(dll::batch_size<100>{},dll::normalize_pre{});
// Build the network
using network_t=dll::dyn_network_desc<
dll::network_layers<
dll::dense_layer<28*28,500>,
dll::dense_layer<500,250>,
dll::dense_layer<250,10,dll::softmax>
>
,dll::updater<dll::updater_type::NADAM>// Nesterov Adam (NADAM)
,dll::batch_size<100>// The mini-batch size
,dll::shuffle // Shuffle before each epoch
>::network_t;
autonet =std::make_unique<network_t>();
// Train the network for performance sake
net->fine_tune(dataset.train(),50);
// Test the network on test set
net->evaluate(dataset.test());
return0;
}
這個例子是在 MNIST 數據集上訓練並測試的簡單 3 層全連接神經網絡。
首先,對於頭文件(include),你需要包含你將使用的層,在這個例子中只有密集層(dense layer)。然後,你需要包含 network.hpp,這是每一個網絡的基本頭文件。而且最後的標頭就是數據集支持。
在 main 函數中,首先需要加載全部 MNIST 數據集,然後給出兩個選項(該函數有一系列可選的參數)。在這裏,我們設置批量大小,並指示每一個樣本都必須歸一化爲平均值爲 0,方差爲 1。
之後是很重要的部分,即網絡的聲明。在 DLL 中,一個網絡是一個類型(type)。類型有兩個性質,層(layers,包含在 dll::network_layers 中),和選項(options,一系列參數選項),跟隨層之後。在這個例子中,我們聲明瞭三個層,第一層有 500 個隱藏單元,第二層有 250 個,而最後一層有 10 個。每一層都有一系列參數選項。最後一層使用 Softmax 激活函數,而不是默認的 Sigmoid 函數。網絡本身有 3 個選項。我們將使用 Nesterov Adam(NAdam)優化器,批量大小爲 100(必須等於前面數據集提取時聲明的批量大小),而在每一個 epoch 之前數據集將被重組(shuffled)。
然後,我們將簡單地使用 std::make_unique 命令創建該網絡,在訓練集上訓練 50 個 epoch,並在測試集上測試。
以下是該網絡的代碼:
Networkwith3layers
Dense(dyn):784->SIGMOID ->500
Dense(dyn):500->SIGMOID ->250
Dense(dyn):250->SOFTMAX ->10
Totalparameters:519500
Dataset
Training:In-MemoryDataGenerator
Size:60000
Batches:600
AugmentedSize:60000
Testing:In-MemoryDataGenerator
Size:10000
Batches:100
AugmentedSize:10000
Trainthe network with"Stochastic Gradient Descent"
Updater:NADAM
Loss:CATEGORICAL_CROSS_ENTROPY
EarlyStop:Goal(error)
Withparameters:
epochs=50
batch_size=100
learning_rate=0.002
beta1=0.9
beta2=0.999
Epoch0/50-Classificationerror:0.03248Loss:0.11162Time3187ms
Epoch1/50-Classificationerror:0.02737Loss:0.08670Time3063ms
Epoch2/50-Classificationerror:0.01517Loss:0.04954Time3540ms
Epoch3/50-Classificationerror:0.01022Loss:0.03284Time2954ms
Epoch4/50-Classificationerror:0.00625Loss:0.02122Time2936ms
Epoch5/50-Classificationerror:0.00797Loss:0.02463Time2729ms
Epoch6/50-Classificationerror:0.00668Loss:0.02066Time2921ms
Epoch7/50-Classificationerror:0.00953Loss:0.02710Time2894ms
Epoch8/50-Classificationerror:0.00565Loss:0.01666Time2703ms
Epoch9/50-Classificationerror:0.00562Loss:0.01644Time2759ms
Epoch10/50-Classificationerror:0.00595Loss:0.01789Time2572ms
Epoch11/50-Classificationerror:0.00555Loss:0.01734Time2586ms
Epoch12/50-Classificationerror:0.00505Loss:0.01446Time2575ms
Epoch13/50-Classificationerror:0.00600Loss:0.01727Time2644ms
Epoch14/50-Classificationerror:0.00327Loss:0.00898Time2636ms
Epoch15/50-Classificationerror:0.00392Loss:0.01180Time2660ms
Epoch16/50-Classificationerror:0.00403Loss:0.01231Time2587ms
Epoch17/50-Classificationerror:0.00445Loss:0.01307Time2566ms
Epoch18/50-Classificationerror:0.00297Loss:0.00831Time2857ms
Epoch19/50-Classificationerror:0.00335Loss:0.01001Time2931ms
Epoch20/50-Classificationerror:0.00378Loss:0.01081Time2772ms
Epoch21/50-Classificationerror:0.00332Loss:0.00950Time2964ms
Epoch22/50-Classificationerror:0.00400Loss:0.01210Time2773ms
Epoch23/50-Classificationerror:0.00393Loss:0.01081Time2721ms
Epoch24/50-Classificationerror:0.00415Loss:0.01218Time2595ms
Epoch25/50-Classificationerror:0.00347Loss:0.00947Time2604ms
Epoch26/50-Classificationerror:0.00535Loss:0.01544Time3005ms
Epoch27/50-Classificationerror:0.00272Loss:0.00828Time2716ms
Epoch28/50-Classificationerror:0.00422Loss:0.01211Time2614ms
Epoch29/50-Classificationerror:0.00417Loss:0.01148Time2701ms
Epoch30/50-Classificationerror:0.00498Loss:0.01439Time2561ms
Epoch31/50-Classificationerror:0.00385Loss:0.01085Time2704ms
Epoch32/50-Classificationerror:0.00305Loss:0.00879Time2618ms
Epoch33/50-Classificationerror:0.00343Loss:0.00889Time2843ms
Epoch34/50-Classificationerror:0.00292Loss:0.00833Time2887ms
Epoch35/50-Classificationerror:0.00327Loss:0.00895Time2644ms
Epoch36/50-Classificationerror:0.00203Loss:0.00623Time2658ms
Epoch37/50-Classificationerror:0.00233Loss:0.00676Time2685ms
Epoch38/50-Classificationerror:0.00298Loss:0.00818Time2948ms
Epoch39/50-Classificationerror:0.00410Loss:0.01195Time2778ms
Epoch40/50-Classificationerror:0.00173Loss:0.00495Time2843ms
Epoch41/50-Classificationerror:0.00232Loss:0.00709Time2743ms
Epoch42/50-Classificationerror:0.00292Loss:0.00861Time2873ms
Epoch43/50-Classificationerror:0.00483Loss:0.01365Time2887ms
Epoch44/50-Classificationerror:0.00240Loss:0.00694Time2918ms
Epoch45/50-Classificationerror:0.00247Loss:0.00734Time2885ms
Epoch46/50-Classificationerror:0.00278Loss:0.00725Time2785ms
Epoch47/50-Classificationerror:0.00262Loss:0.00687Time2842ms
Epoch48/50-Classificationerror:0.00352Loss:0.01002Time2665ms
Epoch49/50-Classificationerror:0.00232Loss:0.00668Time2747ms
Restorethe best (error)weights from epoch 40
Trainingtook 142s
error:0.02040
loss:0.08889
首先正如代碼中所示,是網絡和數據集的展示,然後是網絡的訓練過程的每一個 epoch 的信息,最後是評估的結果。在大約 2 分半的時間內就能訓練一個可以識別 MNIST 數字的網絡,而錯誤率是 2.04%,這個結果不錯,但還能繼續優化。
簡單介紹一下如何編譯。可以直接使用 sudo make install_headers 命令下載 dll 庫到你計算機 checked-out dll 文件夾上,然後使用一下命令對文件進行簡單的編譯:
clang++ -std=c++14 file.cpp
或者,如果需要將 dll 複製到本地的 dll 目錄中,你需要具體說明頭文件的文件夾:
clang++ -std=c++14 -Idll/include -Idll/etl/lib/include -dll/Ietl/include/ -Idll/mnist/include/ -Idll/cifar-10/include/ file.cpp
以下幾個編譯選項可以幫助你提升性能:
-DETL_PARALLEL:允許並行計算
-DETL_VECTORIZE_FULL:允許算法的完全向量化
-DETL_BLAS_MODE:將使該庫 know about 一個 BLAS 庫(比如 MKL),你必須爲 BLAS 庫添加一個頭文件選項和連接選項作爲可選項。
-DETL_CUBLAS_MODE: 使該庫知道 NVIDIA cublas 是可用的,必須添加合適的選項(頭文件目錄和連接庫)
-DETL_CUDNN_MODE:使該庫知道 NVIDIA cudnn 是可用的,必須添加合適的選項(頭文件目錄和連接庫)
-DETL_EGBLAS_MODE:使該庫知道你安裝了 etl-gpu-blas,必須添加合適的選項(頭文件目錄和連接庫)
如果想要得到最佳的 CPU 性能,需要用到前面 3 個選項。如果想要得到最佳的 GPU 性能,需要用到後面 3 個選項。由於有些算法並不是完全在 GPU 上計算的,最好使用所有的選項。
接下來我們重複上述實驗,但這次使用的是一個包含兩個卷積層和兩個池化層的卷積神經網絡:
#include "dll/neural/conv_layer.hpp"
#include "dll/neural/dense_layer.hpp"
#include "dll/pooling/mp_layer.hpp"
#include "dll/network.hpp"
#include "dll/datasets.hpp"
#include "mnist/mnist_reader.hpp"
#include "mnist/mnist_utils.hpp"
intmain(int/*argc*/,char*/*argv*/[]){
// Load the dataset
autodataset =dll::make_mnist_dataset(dll::batch_size<100>{},dll::scale_pre<255>{});
// Build the network
using network_t=dll::dyn_network_desc<
dll::network_layers<
dll::conv_layer<1,28,28,8,5,5>,
dll::mp_2d_layer<8,24,24,2,2>,
dll::conv_layer<8,12,12,8,5,5>,
dll::mp_2d_layer<8,8,8,2,2>,
dll::dense_layer<8*4*4,150>,
dll::dense_layer<150,10,dll::softmax>
>
,dll::updater<dll::updater_type::NADAM>// Momentum
,dll::batch_size<100>// The mini-batch size
,dll::shuffle // Shuffle the dataset before each epoch
>::network_t;
autonet =std::make_unique<network_t>();
// Display the network and dataset
net->display();
dataset.display();
// Train the network
net->fine_tune(dataset.train(),25);
// Test the network on test set
net->evaluate(dataset.test());
return0;
}
比起之前的例子來看並沒有太多變化。這個網絡起始於一個卷積層,然後是一個池化層,然後又是一個卷積層和池化層,最後是兩個全連接層。另一個區別是我們將輸入除以 255((dll::scale_pre<255>{}))而不是歸一化。最後,我們只訓練了 25 個 epoch。
一旦進行編譯和運行,結果將是如下所示的樣子:
Networkwith6layers
Conv(dyn):1x28x28->(8x5x5)->SIGMOID ->8x24x24
MP(2d):8x24x24->(2x2)->8x12x12
Conv(dyn):8x12x12->(8x5x5)->SIGMOID ->8x8x8
MP(2d):8x8x8->(2x2)->8x4x4
Dense(dyn):128->SIGMOID ->150
Dense(dyn):150->SOFTMAX ->10
Totalparameters:21100
Dataset
Training:In-MemoryDataGenerator
Size:60000
Batches:600
AugmentedSize:60000
Testing:In-MemoryDataGenerator
Size:10000
Batches:100
AugmentedSize:10000
Trainthe network with"Stochastic Gradient Descent"
Updater:NADAM
Loss:CATEGORICAL_CROSS_ENTROPY
EarlyStop:Goal(error)
Withparameters:
epochs=25
batch_size=100
learning_rate=0.002
beta1=0.9
beta2=0.999
Epoch0/25-Classificationerror:0.09392Loss:0.31740Time7298ms
Epoch1/25-Classificationerror:0.07005Loss:0.23473Time7298ms
Epoch2/25-Classificationerror:0.06915Loss:0.22532Time7364ms
Epoch3/25-Classificationerror:0.04750Loss:0.15286Time7787ms
Epoch4/25-Classificationerror:0.04082Loss:0.13191Time7377ms
Epoch5/25-Classificationerror:0.03258Loss:0.10283Time7334ms
Epoch6/25-Classificationerror:0.03032Loss:0.09791Time7304ms
Epoch7/25-Classificationerror:0.02727Loss:0.08453Time7345ms
Epoch8/25-Classificationerror:0.02410Loss:0.07641Time7443ms
Epoch9/25-Classificationerror:0.02448Loss:0.07612Time7747ms
Epoch10/25-Classificationerror:0.02023Loss:0.06370Time7626ms
Epoch11/25-Classificationerror:0.01920Loss:0.06194Time7364ms
Epoch12/25-Classificationerror:0.01810Loss:0.05851Time7391ms
Epoch13/25-Classificationerror:0.01575Loss:0.05074Time7316ms
Epoch14/25-Classificationerror:0.01542Loss:0.04826Time7365ms
Epoch15/25-Classificationerror:0.01392Loss:0.04574Time7634ms
Epoch16/25-Classificationerror:0.01287Loss:0.04061Time7367ms
Epoch17/25-Classificationerror:0.01167Loss:0.03779Time7381ms
Epoch18/25-Classificationerror:0.01202Loss:0.03715Time7495ms
Epoch19/25-Classificationerror:0.00967Loss:0.03268Time7359ms
Epoch20/25-Classificationerror:0.00955Loss:0.03012Time7344ms
Epoch21/25-Classificationerror:0.00853Loss:0.02809Time7314ms
Epoch22/25-Classificationerror:0.00832Loss:0.02834Time7329ms
Epoch23/25-Classificationerror:0.00807Loss:0.02603Time7336ms
Epoch24/25-Classificationerror:0.00682Loss:0.02327Time7335ms
Trainingtook 186s
error:0.01520
loss:0.05183
這個網絡比之前的稍微要好一些,在 3 分鐘的時間裏達到了 1.52% 的錯誤率。如果你感興趣的話,可以在 Github 中找到更多的例子。
性能
如果你看過我最新的博客,那麼你可能已經看過以下部分信息,但我仍然想在這裏強調一下。我在 DLL 庫的性能表現上做了大量工作。我決定將 DLL 的性能和流行的框架如 TensorFlow、Keras、Torch 和 Caffe 做個對比。我也試過 DeepLearning4J,但出現了很多問題使我不得不先放棄它。如果有人對其中的結果有興趣我也可以在某個網站發佈。所有的框架都以默認選項安裝,並且都可以使用 MKL。
第一個實驗是在 MNIST 數據集上訓練一個 3 層網絡:
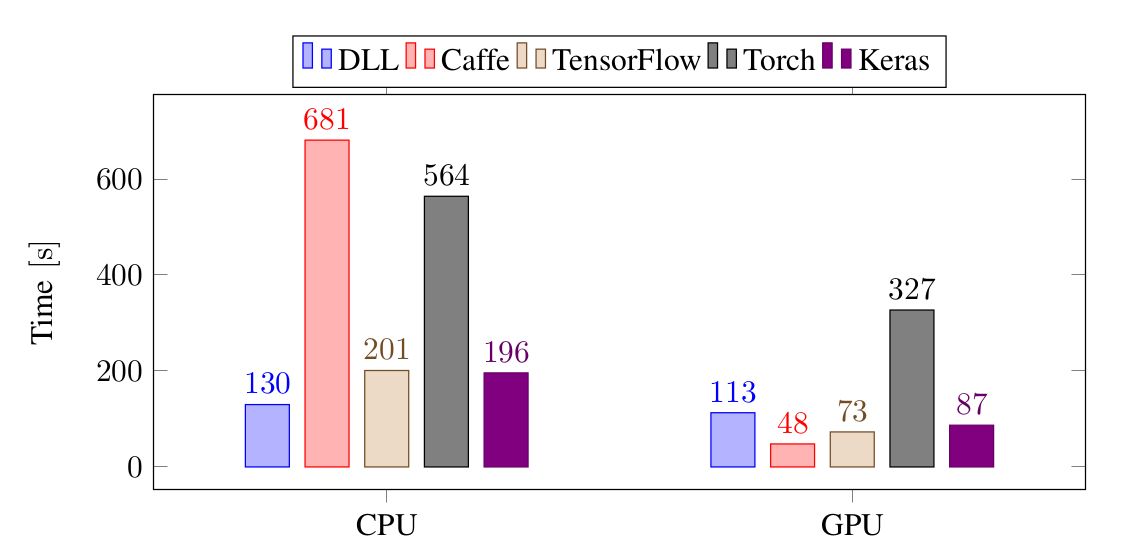
對於 CPU,DLL 訓練這個網絡是最快的。比 TensorFlow 和 Keras 快大約 35%,比 Torch 快 4 倍,比 Caffe 快 5 倍。而對於 GPU,Caffe 是最快的,緊接着是 Keras,TensorFlow 和 DLL,而 Torch 是最慢的。
以下是在同樣的任務中使用 CNN 訓練的結果:
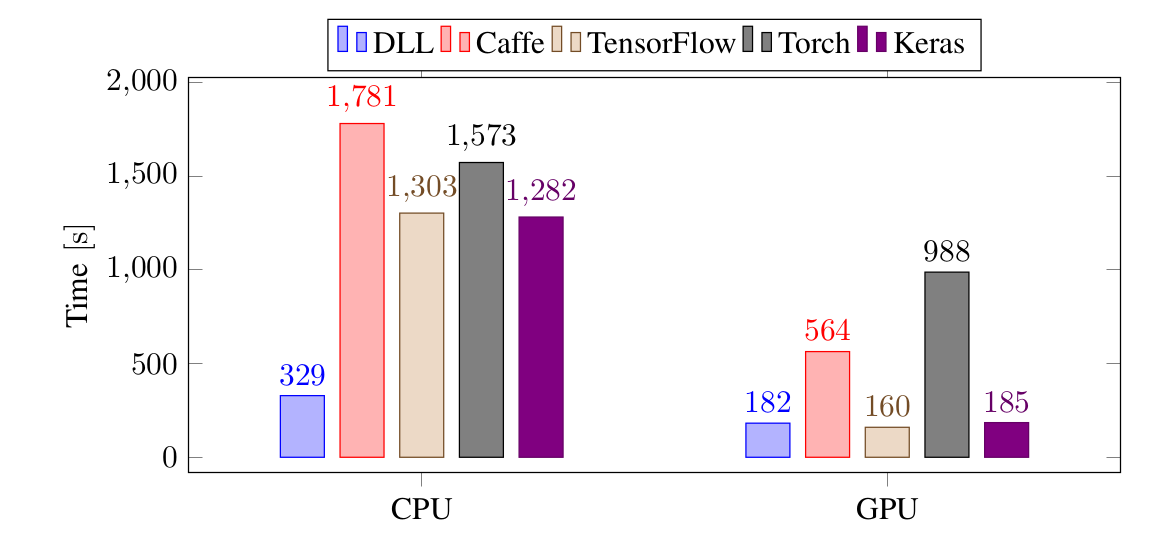
再一次,對於 CPU,DLL 是最快的,非常明顯,比起 TensorFlow 和 Keras 快 4 倍,比 Torch 和 Caffe 快 5 倍。對於 GPU,DLL 和 TensorFlow 以及 Keras 持平,比 Caffe 快 3 倍,比 Torch 快 5 倍。
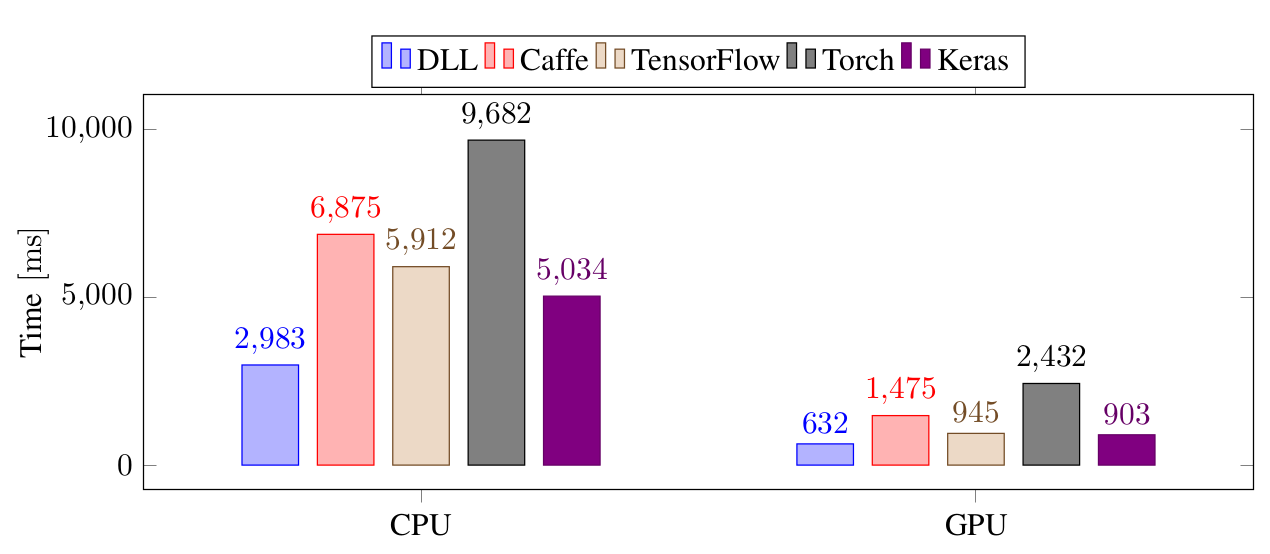
以下是在 CIFAR-10 上用更大的 CNN 訓練的結果:

在更大的 CNN 中,區別沒有之前的那麼明顯,儘管如此,對於 CPU,DLL 仍然是最快的,比 TensorFlow、Keras 和 Torch 快兩倍,比 Caffe 快 3 倍。對於 GPU,DLL 比 TensorFlow 和 Keras 稍快,比 Caffe 快 2.7 倍,比 Torch 快 5 倍。
最後一個實驗是在 Imagenet 上用 12 層的 CNN 訓練。mini-batch 設置爲 128。
DLL 無論是在 CPU 還是 GPU 上都比其它所有框架要快。DLL 和 TensorFlow、Keras 的最大的不同主要是由於用 Python 代碼讀取 ImageNet 的圖片的能力很差,而 DLL 中的代碼已經優化過。
綜上,在所有的實驗中,DLL 的 CPU 計算都是最快的。對於 GPU,除了超小型全連接神經網絡,DLL 也總是最快的,和 TensorFlow、Keras 並駕齊驅。
如果感興趣,可以在這裏找到實驗的代碼:https://github.com/wichtounet/frameworks
下一步
我並不知道下一個版本的 DLL 將具體包括哪些函數,但我知道它在以後的發展方向。
我真的希望能使用 DLL 執行文本分類任務。計劃第一步將支持文本的嵌入學習,並在嵌入上使用 CNN。我同樣計劃添加支持合併 CNN 層的能力,從而我們能使用各種大小的濾波器,希望第一步不要花太多時間。第二步希望將循環神經網絡(RNN)納入該框架中。當然首先只會支持簡單的 RNN 單元,但後來會添加 LSTM 單元和 GRU 單元的支持。這一部分肯定需要很長的時間,但我真的希望能通過這個理解這些循環神經網絡的原理到底是什麼。
我關注的下一件事是該神經網絡庫的文檔構建。當然現在使用案例來了解各種函數的用法是比較好的,但還是需要列出可能的神經網絡層函數和它們所有的可選參數。我還希望能有更多的實現案例,特別是當添加嵌入和 RNN 支持的時候。
此外,雖然性能一般來說還是不錯的,但還有一些地方需要改進。例如目前很多運算(如批量歸一化和 Dropout)在 GPU 上是比較低效的,我希望所有運算在 GPU 中都能高效地執行。還有一些運算如批量歸一化或 SGD 優化器等在 CPU 上運行比較低效,所以我還需要解決這一些問題。理想的情況是,即使不使用性能庫,DLL 也能表現的比較好。
最後,我還希望能提升編譯時間。雖然最近的修正已經令 DLL 程序的編譯過程更加快速,但我還希望取得更快的速度。
下載 DLL
讀者可以在 GitHub 中下載 DLL,如果你們對 1.0 版本比較感興趣,可以直接查看發佈頁面(Releases pages)或複製 tag 1.0。下面還有一些分支:
master 是永遠的開發分支,可能並不是太穩定
stable 分支永遠指向最新的 tag,並不會經常更新
對於未來的版本,總會有 tag 指向對應的 commits,你可以通過 GitHub 或發佈的 tag 訪問以前的版本。
對於文檔,當前最好的文檔說明是目前可用的實現案例。你可以查看測試案例的源代碼,其中該軟件庫每一個函數都得到了使用。如果這一次開發的神經網絡庫得到較多的關注,後面我們將關注文檔的構建。
原文鏈接:https://baptiste-wicht.com/posts/2017/10/deep-learning-library-10-fast-neural-network-library.html
本文爲機器之心編譯,轉載請聯繫本公衆號獲得授權。
責任編輯: