我們常使用深度學習框架構建強大的卷積神經網絡,這些框架不僅能輕鬆調用卷積運算,同時還以矩陣乘法的方式大大提升了並行計算效率。但僅使用 NumPy 庫創建 CNN 也許是理解這種網絡的更好方法,本文就使用純 NumPy 代碼構建卷積層、ReLU 層和最大池化層等。
在某些情況下,使用 ML/DL 庫中已經存在的模型可能會很便捷。但爲了更好地控制和理解模型,你應該自己去實現它們。本文展示瞭如何僅使用 NumPy 庫來實現 CNN。
卷積神經網絡(CNN)是分析圖像等多維信號的當前最優技術。目前已有很多庫可以實現 CNN,如 TensorFlow 和 Keras 等。這種庫僅提供一個抽象的 API,因此可以大大降低開發難度,並避免實現的複雜性,不過使用這種庫的開發人員無法接觸到一些細節,這些細節可能在實踐中很重要。
有時,數據科學家必須仔細查看這些細節才能提高性能。在這種情況下,最好自己親手構建此類模型,這可以幫助你最大程度地控制網絡。因此在本文中,我們將僅使用 NumPy 嘗試創建 CNN。我們會創建三個層,即卷積層(簡稱 conv)、ReLU 層和最大池化層。所涉及的主要步驟如下:
讀取輸入圖像。
準備濾波器。
卷積層:使用濾波器對輸入圖像執行卷積操作。
ReLU 層:將 ReLU 激活函數應用於特徵圖(卷積層的輸出)。
最大池化層:在 ReLU 層的輸出上應用池化操作。
堆疊卷積層、ReLU 層和最大池化層。
1. 讀取輸入圖像
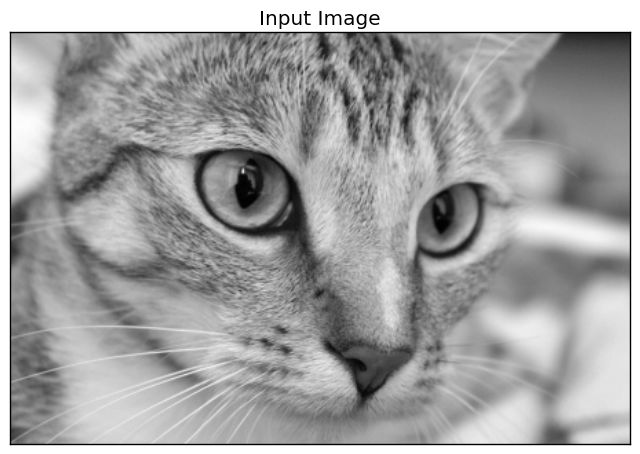
以下代碼讀取 skimage Python 庫中一個已有圖像,並將其轉換爲灰度圖。
1. import skimage.data 2. # Reading the image 3. img = skimage.data.chelsea() 4. # Converting the image into gray. 5. img = skimage.color.rgb2gray(img)讀取圖像是第一步,因爲後續步驟取決於輸入大小,下圖爲轉換後的灰度圖。
2. 準備濾波器
以下代碼爲第一個卷積層(簡稱 l1)準備濾波器組:
1. l1_filter = numpy.zeros((2,3,3))根據濾波器的數量和每個濾波器的大小創建數組。我們有 2 個大小爲 3*3 的濾波器,因此數組大小爲 (2=num_filters, 3=num_rows_filter, 3=num_columns_filter)。將濾波器的尺寸選擇爲沒有深度的 2D 數組,因爲輸入圖像是灰度圖且深度爲 1。如果圖像是具有 3 個通道的 RGB,則濾波器大小必須是(3, 3, 3=depth)。
濾波器組的大小由上述 0 數組指定,但不是由濾波器的實際值指定。可以按如下方式覆寫這些值,以檢測垂直和水平邊緣。
1. l1_filter[0, :, :] = numpy.array([[[-1, 0, 1], 2. [-1, 0, 1], 3. [-1, 0, 1]]]) 4. l1_filter[1, :, :] = numpy.array([[[1, 1, 1], 5. [0, 0, 0], 6. [-1, -1, -1]]]) 3. 卷積層
在準備好濾波器之後,下一步就是用它們對輸入圖像執行卷積操作。下面一行使用 conv 函數對圖像執行卷積操作:
1. l1_feature_map = conv(img, l1_filter) 此類函數只接受兩個參數,即圖像和濾波器組,實現如下:
1. def conv(img, conv_filter): 2. if len(img.shape) > 2 or len(conv_filter.shape) > 3: # Check if number of image channels matches the filter depth. 3. if img.shape[-1] != conv_filter.shape[-1]: 4. print("Error: Number of channels in both image and filter must match.") 5. sys.exit() 6. if conv_filter.shape[1] != conv_filter.shape[2]: # Check if filter dimensions are equal. 7. print('Error: Filter must be a square matrix. I.e. number of rows and columns must match.') 8. sys.exit() 9. if conv_filter.shape[1]%2==0: # Check if filter diemnsions are odd. 10. print('Error: Filter must have an odd size. I.e. number of rows and columns must be odd.') 11. sys.exit() 12. 13. # An empty feature map to hold the output of convolving the filter(s) with the image. 14. feature_maps = numpy.zeros((img.shape[0]-conv_filter.shape[1]+1, 15. img.shape[1]-conv_filter.shape[1]+1, 16. conv_filter.shape[0])) 17. 18. # Convolving the image by the filter(s). 19. for filter_num in range(conv_filter.shape[0]): 20. print("Filter ", filter_num + 1) 21. curr_filter = conv_filter[filter_num, :] # getting a filter from the bank. 22. """ 23. Checking if there are mutliple channels for the single filter. 24. If so, then each channel will convolve the image. 25. The result of all convolutions are summed to return a single feature map. 26. """ 27. if len(curr_filter.shape) > 2: 28. conv_map = conv_(img[:, :, 0], curr_filter[:, :, 0]) # Array holding the sum of all feature maps. 29. for ch_num in range(1, curr_filter.shape[-1]): # Convolving each channel with the image and summing the results. 30. conv_map = conv_map + conv_(img[:, :, ch_num], 31. curr_filter[:, :, ch_num]) 32. else: # There is just a single channel in the filter. 33. conv_map = conv_(img, curr_filter) 34. feature_maps[:, :, filter_num] = conv_map # Holding feature map with the current filter.35. return feature_maps # Returning all feature maps. 該函數首先確保每個濾波器的深度等於圖像通道的數量。在下面的代碼中,外部的 if 語句將檢查通道和濾波器是否有深度。如果有,則內部 if 語句檢查它們是否相等,如果不匹配,腳本將退出。
1. if len(img.shape) > 2 or len(conv_filter.shape) > 3: # Check if number of image channels matches the filter depth. 2. if img.shape[-1] != conv_filter.shape[-1]: 3. print("Error: Number of channels in both image and filter must match.") 此外,濾波器的尺寸行數和列數是奇數且相等。使用以下兩個 if 語句對其進行檢查。如果不滿足這些條件,腳本將退出。
1. if conv_filter.shape[1] != conv_filter.shape[2]: # Check if filter dimensions are equal. 2. print('Error: Filter must be a square matrix. I.e. number of rows and columns must match.') 3. sys.exit() 4. if conv_filter.shape[1]%2==0: # Check if filter diemnsions are odd. 5. print('Error: Filter must have an odd size. I.e. number of rows and columns must be odd.') 6. sys.exit() 如果不滿足上述所有的 if 語句,則表示濾波器的深度適合圖像,且可應用卷積操作。濾波器對圖像的卷積從初始化一個數組開始,通過根據以下代碼指定其大小來保存卷積的輸出(即特徵圖):
1. # An empty feature map to hold the output of convolving the filter(s) with the image. 2. feature_maps = numpy.zeros((img.shape[0]-conv_filter.shape[1]+1, 3. img.shape[1]-conv_filter.shape[1]+1, 4. conv_filter.shape[0])) 特徵圖大小將與上述代碼中的(img_rows-filter_rows+1, image_columns-filter_columns+1, num_filters)值相等。請注意,濾波器組中的每個濾波器都有一個輸出特徵圖。因此將濾波器組(conv_filter.shape[0])中的濾波器數量將指定爲第三個參數。
1. # Convolving the image by the filter(s). 2. for filter_num in range(conv_filter.shape[0]): 3. print("Filter ", filter_num + 1) 4. curr_filter = conv_filter[filter_num, :] # getting a filter from the bank. 5. """ 6. Checking if there are mutliple channels for the single filter. 7. If so, then each channel will convolve the image. 8. The result of all convolutions are summed to return a single feature map. 9. """ 10. if len(curr_filter.shape) > 2: 11. conv_map = conv_(img[:, :, 0], curr_filter[:, :, 0]) # Array holding the sum of all feature maps. 12. for ch_num in range(1, curr_filter.shape[-1]): # Convolving each channel with the image and summing the results. 13. conv_map = conv_map + conv_(img[:, :, ch_num], 14. curr_filter[:, :, ch_num]) 15. else: # There is just a single channel in the filter. 16. conv_map = conv_(img, curr_filter) 17. feature_maps[:, :, filter_num] = conv_map # Holding feature map with the current filter. 外部循環在濾波器組中的每個濾波器上進行迭代,並根據下面這行代碼返回,以執行後續步驟:
1. curr_filter = conv_filter[filter_num, :] # getting a filter from the bank. 如果要卷積的圖像通道數大於 1,則濾波器深度必須與通道數量相等。在這種情況下,卷積是通過將每個圖像通道與其在濾波器中對應的通道進行卷積來完成的。最後的結果加起來就是輸出特徵圖。如果圖像只有一個通道,則卷積將非常容易。此類行爲由 if-else 塊決定:
1. if len(curr_filter.shape) > 2: 2. conv_map = conv_(img[:, :, 0], curr_filter[:, :, 0]) # Array holding the sum of all feature map 3. for ch_num in range(1, curr_filter.shape[-1]): # Convolving each channel with the image and summing the results. 4. conv_map = conv_map + conv_(img[:, :, ch_num], 5. curr_filter[:, :, ch_num]) 6. else: # There is just a single channel in the filter. 7. conv_map = conv_(img, curr_filter) 你可能會注意到,卷積是由名爲 conv_的函數實現的,該函數與 conv 函數不同。conv 函數僅接受輸入圖像和濾波器組,但本身不執行卷積操作,只負責將每組待卷積的輸入-濾波器組傳輸到 conv_函數上。這只是爲了使代碼更易於調查。下面是 conv_ 函數的實現:
1. def conv_(img, conv_filter): 2. filter_size = conv_filter.shape[0] 3. result = numpy.zeros((img.shape)) 4. #Looping through the image to apply the convolution operation. 5. for r in numpy.uint16(numpy.arange(filter_size/2, 6. img.shape[0]-filter_size/2-2)): 7. for c in numpy.uint16(numpy.arange(filter_size/2, img.shape[1]-filter_size/2-2)): 8. #Getting the current region to get multiplied with the filter. 9. curr_region = img[r:r+filter_size, c:c+filter_size] 10. #Element-wise multipliplication between the current region and the filter. 11. curr_result = curr_region * conv_filter 12. conv_sum = numpy.sum(curr_result) #Summing the result of multiplication. 13. result[r, c] = conv_sum #Saving the summation in the convolution layer feature map. 14. 15. #Clipping the outliers of the result matrix. 16. final_result = result[numpy.uint16(filter_size/2):result.shape[0]-numpy.uint16(filter_size/2), 17. numpy.uint16(filter_size/2):result.shape[1]-numpy.uint16(filter_size/2)] 18. return final_result 它在圖像上迭代,並根據以下代碼提取與濾波器大小相等的區域:
1. curr_region = img[r:r+filter_size, c:c+filter_size] 然後,它在區域和濾波器之間應用逐元素乘法,並根據以下代碼對它們求和,以獲取單個值作爲輸出:
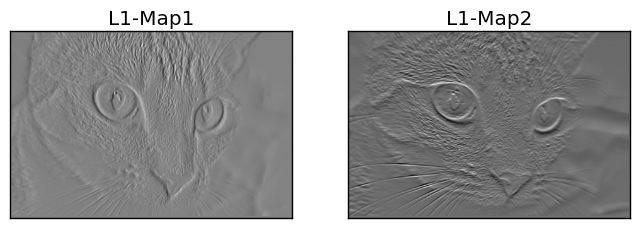
1. #Element-wise multipliplication between the current region and the filter. 2. curr_result = curr_region * conv_filter 3. conv_sum = numpy.sum(curr_result) #Summing the result of multiplication. 4. result[r, c] = conv_sum #Saving the summation in the convolution layer feature map. 在濾波器對輸入圖像執行卷積操作之後,特徵圖由 conv 函數返回。下圖爲此類卷積層返回的特徵圖。
卷積層的輸出將被應用到 ReLU 層。
4. ReLU 層
ReLU 層對卷積層返回的每個特徵圖應用 ReLU 激活函數。根據以下代碼使用 relu 函數使用它:
l1_feature_map_relu = relu(l1_feature_map)relu 函數的實現方式如下:
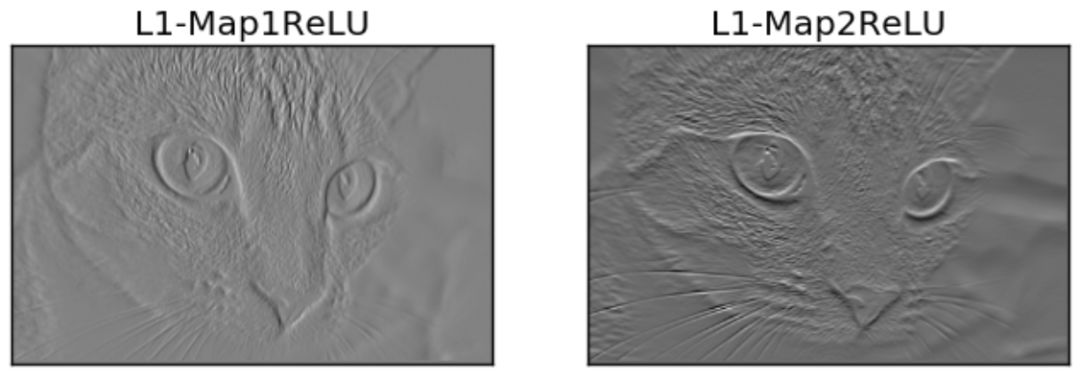
1. def relu(feature_map): 2. #Preparing the output of the ReLU activation function. 3. relu_out = numpy.zeros(feature_map.shape) 4. for map_num in range(feature_map.shape[-1]): 5. for r in numpy.arange(0,feature_map.shape[0]): 6. for c in numpy.arange(0, feature_map.shape[1]): 7. relu_out[r, c, map_num] = numpy.max(feature_map[r, c, map_num], 0) 這很簡單。只要循環地將 ReLU 函數應用於特徵圖中的每個元素,並在特徵圖中的原始值大於 0 時將其返回。其他情況下返回 0。ReLU 層的輸出如下圖所示。
ReLU 層的輸出將饋送到最大池化層。
5. 最大池化層
最大池化層接受 ReLU 層的輸出,並根據以下代碼應用最大池化操作:
1. l1_feature_map_relu_pool = pooling(l1_feature_map_relu, 2, 2) 最大池化層使用 pooling 函數實現,如下所示:
1. def pooling(feature_map, size=2, stride=2): 2. #Preparing the output of the pooling operation. 3. pool_out = numpy.zeros((numpy.uint16((feature_map.shape[0]-size+1)/stride), 4. numpy.uint16((feature_map.shape[1]-size+1)/stride), 5. feature_map.shape[-1])) 6. for map_num in range(feature_map.shape[-1]): 7. r2 = 0 8. for r in numpy.arange(0,feature_map.shape[0]-size-1, stride): 9. c2 = 0 10. for c in numpy.arange(0, feature_map.shape[1]-size-1, stride): 11. pool_out[r2, c2, map_num] = numpy.max(feature_map[r:r+size, c:c+size]) 12. c2 = c2 + 1 13. r2 = r2 +1 該函數接受三個輸入,即 ReLU 層的輸出、池化掩碼大小和步長。它只需創建一個空數組,如前所述,用於保存此類層的輸出。此類數組的大小是根據大小和步長參數指定的,如以下代碼所示:
1. pool_out = numpy.zeros((numpy.uint16((feature_map.shape[0]-size+1)/stride), 2. numpy.uint16((feature_map.shape[1]-size+1)/stride), 3. feature_map.shape[-1])) 然後,它會根據循環變量 map_num 和外部循環一個一個通道地處理圖像。最大池操作將應用於輸入中的每個通道。根據所使用的步長和大小裁剪區域,根據以下代碼在輸出數組中返回最大值:
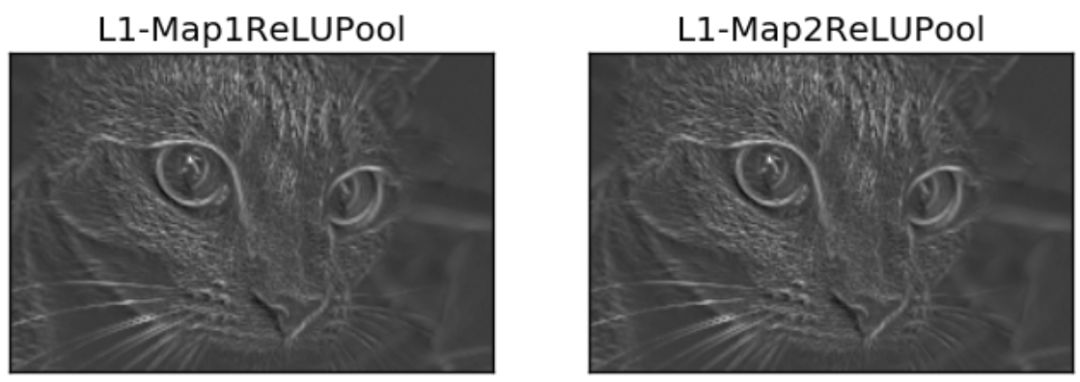
pool_out[r2, c2, map_num] = numpy.max(feature_map[r:r+size, c:c+size])這種池化層的輸出如下圖所示。請注意,池化層輸出要小於其輸入,即使它們在圖形中看起來大小相同。
6. 層級的堆疊
至此,具有卷積、ReLU 和最大池化層的 CNN 體系架構已經完成。除了前面提到的層以外,還可以堆疊其它層來加深網絡。
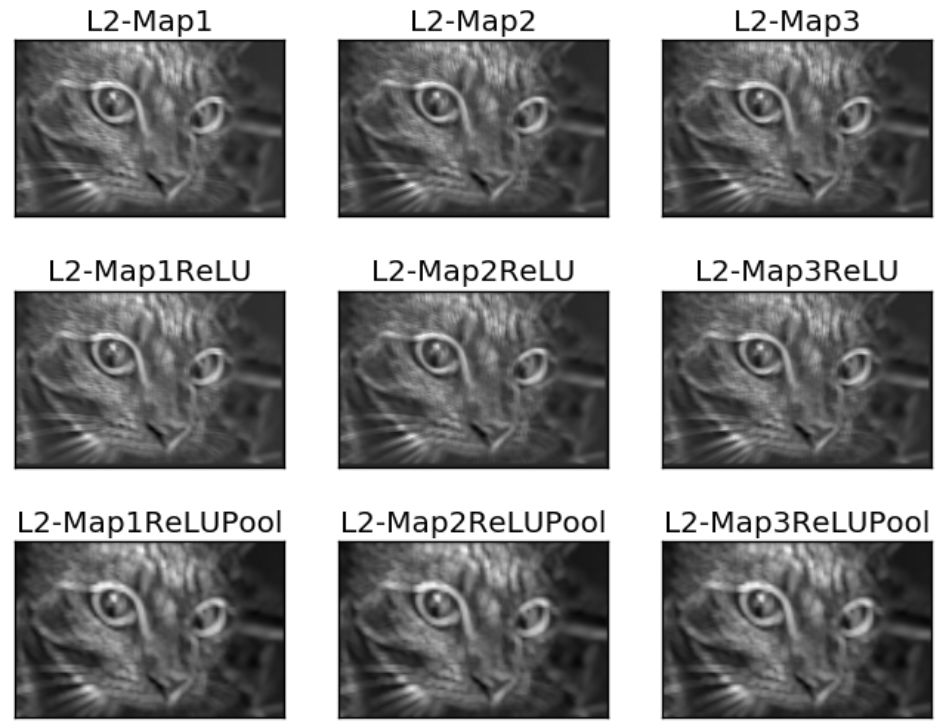
1. # Second conv layer 2. l2_filter = numpy.random.rand(3, 5, 5, l1_feature_map_relu_pool.shape[-1]) 3. print("\n**Working with conv layer 2**") 4. l2_feature_map = conv(l1_feature_map_relu_pool, l2_filter) 5. print("\n**ReLU**") 6. l2_feature_map_relu = relu(l2_feature_map) 7. print("\n**Pooling**") 8. l2_feature_map_relu_pool = pooling(l2_feature_map_relu, 2, 2) 9. print("**End of conv layer 2**\n") 前一卷積層使用 3 個濾波器,其值隨機生成。因此,這種卷積層會帶來 3 個特徵圖。後面的 ReLU 層和池化層也是如此,這些層的輸出如下所示:
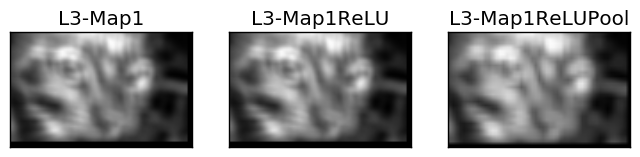
1. # Third conv layer 2. l3_filter = numpy.random.rand(1, 7, 7, l2_feature_map_relu_pool.shape[-1]) 3. print("\n**Working with conv layer 3**") 4. l3_feature_map = conv(l2_feature_map_relu_pool, l3_filter) 5. print("\n**ReLU**") 6. l3_feature_map_relu = relu(l3_feature_map) 7. print("\n**Pooling**") 8. l3_feature_map_relu_pool = pooling(l3_feature_map_relu, 2, 2) 9. print("**End of conv layer 3**\n") 下圖顯示了前幾層的輸出。前一卷積層僅使用一個濾波器,因此只有一個特徵圖作爲輸出。
但是請記住,前面每一層的輸出是下一層的輸入,例如以下代碼接受先前的輸出作爲它們的輸入。
1. l2_feature_map = conv(l1_feature_map_relu_pool, l2_filter) 2. l3_feature_map = conv(l2_feature_map_relu_pool, l3_filter)7. 完整代碼
完整代碼地址:https://github.com/ahmedfgad/NumPyCNN
該代碼包含使用 Matplotlib 庫可視化每個圖層的輸出。
原文鏈接:https://www.kdnuggets.com/2018/04/building-convolutional-neural-network-numpy-scratch.html