2014 年,Ian Goodfellow 提出了生成對抗網絡(GAN),今天,GAN 已經成爲深度學習最熱門的方向之一。本文將重點介紹如何利用 Keras 將 GAN 應用於圖像去模糊(image deblurring)任務當中。
Keras 代碼地址:https://github.com/RaphaelMeudec/deblur-gan
此外,請查閱 DeblurGAN 的原始論文(https://arxiv.org/pdf/1711.07064.pdf)及其 Pytorch 版本實現:https://github.com/KupynOrest/DeblurGAN/。
生成對抗網絡簡介
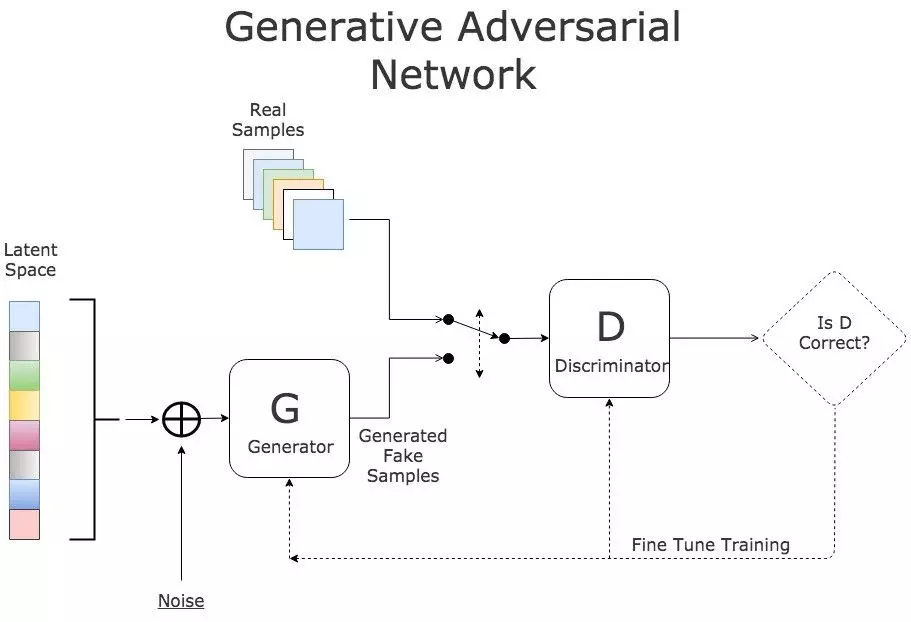
在生成對抗網絡中,有兩個網絡互相進行訓練。生成器通過生成逼真的虛假輸入來誤導判別器,而判別器會分辨輸入是真實的還是人造的。

GAN 訓練流程
訓練過程中有三個關鍵步驟:
使用生成器根據噪聲創造虛假輸入;
利用真實輸入和虛假輸入訓練判別器;
訓練整個模型:該模型是判別器和生成器連接所構建的。
請注意,判別器的權重在第三步中被凍結。
對兩個網絡進行連接的原因是不存在單獨對生成器輸出的反饋。我們唯一的衡量標準是判別器是否能接受生成的樣本。
以上,我們簡要介紹了 GAN 的架構。如果你覺得不夠詳盡,可以參考這篇優秀的介紹:生成對抗網絡初學入門:一文讀懂 GAN 的基本原理(附資源)。
數據
Ian Goodfellow 首先應用 GAN 模型生成 MNIST 數據。而在本教程中,我們將生成對抗網絡應用於圖像去模糊。因此,生成器的輸入不是噪聲,而是模糊的圖像。
我們採用的數據集是 GOPRO 數據集。該數據集包含來自多個街景的人工模糊圖像。根據場景的不同,該數據集在不同子文件夾中分類。
你可以下載簡單版:https://drive.google.com/file/d/1H0PIXvJH4c40pk7ou6nAwoxuR4Qh_Sa2/view
或完整版:https://drive.google.com/file/d/1SlURvdQsokgsoyTosAaELc4zRjQz9T2U/view
我們首先將圖像分配到兩個文件夾 A(模糊)B(清晰)中。這種 A&B 的架構對應於原始的 pix2pix 論文。爲此我創建了一個自定義的腳本在 github 中執行這個任務,請按照 README 的說明去使用它:
https://github.com/RaphaelMeudec/deblur-gan/blob/master/organize_gopro_dataset.py
模型
訓練過程保持不變。首先,讓我們看看神經網絡的架構吧!
生成器
該生成器旨在重現清晰的圖像。該網絡基於 ResNet 模塊,它不斷地追蹤關於原始模糊圖像的演變。本文同樣使用了一個基於 UNet 的版本,但我還沒有實現這個版本。這兩種模塊應該都適合圖像去模糊。

DeblurGAN 生成器網絡架構,源論文《DeblurGAN: Blind Motion Deblurring Using Conditional Adversarial Networks》。
其核心是應用於原始圖像上採樣的 9 個 ResNet 模塊。讓我們來看看 Keras 上的代碼實現!
from keras.layers import Input, Conv2D, Activation, BatchNormalizationfrom keras.layers.merge import Addfrom keras.layers.core import Dropoutdef res_block(input, filters, kernel_size=(3,3), strides=(1,1), use_dropout=False): """ Instanciate a Keras Resnet Block using sequential API. :param input: Input tensor :param filters: Number of filters to use :param kernel_size: Shape of the kernel for the convolution :param strides: Shape of the strides for the convolution :param use_dropout: Boolean value to determine the use of dropout :return: Keras Model """ x = ReflectionPadding2D((1,1))(input) x = Conv2D(filters=filters, kernel_size=kernel_size, strides=strides,)(x) x = BatchNormalization()(x) x = Activation('relu')(x) if use_dropout: x = Dropout(0.5)(x) x = ReflectionPadding2D((1,1))(x) x = Conv2D(filters=filters, kernel_size=kernel_size, strides=strides,)(x) x = BatchNormalization()(x) # Two convolution layers followed by a direct connection between input and output merged = Add()([input, x]) return merged該 ResNet 層基本是卷積層,其輸入和輸出都被添加以形成最終的輸出。
from keras.layers import Input, Activation, Addfrom keras.layers.advanced_activations import LeakyReLUfrom keras.layers.convolutional import Conv2D, Conv2DTransposefrom keras.layers.core import Lambdafrom keras.layers.normalization import BatchNormalizationfrom keras.models import Modelfrom layer_utils import ReflectionPadding2D, res_blockngf = 64input_nc = 3output_nc = 3input_shape_generator = (256, 256, input_nc)n_blocks_gen = 9def generator_model(): """Build generator architecture.""" # Current version : ResNet block inputs = Input(shape=image_shape) x = ReflectionPadding2D((3, 3))(inputs) x = Conv2D(filters=ngf, kernel_size=(7,7), padding='valid')(x) x = BatchNormalization()(x) x = Activation('relu')(x) # Increase filter number n_downsampling = 2 for i in range(n_downsampling): mult = 2**i x = Conv2D(filters=ngf*mult*2, kernel_size=(3,3), strides=2, padding='same')(x) x = BatchNormalization()(x) x = Activation('relu')(x) # Apply 9 ResNet blocks mult = 2**n_downsampling for i in range(n_blocks_gen): x = res_block(x, ngf*mult, use_dropout=True) # Decrease filter number to 3 (RGB) for i in range(n_downsampling): mult = 2**(n_downsampling - i) x = Conv2DTranspose(filters=int(ngf * mult / 2), kernel_size=(3,3), strides=2, padding='same')(x) x = BatchNormalization()(x) x = Activation('relu')(x) x = ReflectionPadding2D((3,3))(x) x = Conv2D(filters=output_nc, kernel_size=(7,7), padding='valid')(x) x = Activation('tanh')(x) # Add direct connection from input to output and recenter to [-1, 1] outputs = Add()([x, inputs]) outputs = Lambda(lambda z: z/2)(outputs) model = Model(inputs=inputs, outputs=outputs, name='Generator') return model生成器架構的 Keras 實現
按照計劃,9 個 ResNet 模塊會應用於輸入的上採樣版本。我們在其中添加了從輸入到輸出的連接,並對結果除以 2 以保持標準化輸出。
這就是生成器的架構!讓我們繼續看看判別器怎麼做吧。
判別器
判別器的目標是判斷輸入圖像是否是人造的。因此,判別器的體系結構是卷積以及輸出單一值。
from keras.layers import Inputfrom keras.layers.advanced_activations import LeakyReLUfrom keras.layers.convolutional import Conv2Dfrom keras.layers.core import Dense, Flattenfrom keras.layers.normalization import BatchNormalizationfrom keras.models import Modelndf = 64output_nc = 3input_shape_discriminator = (256, 256, output_nc)def discriminator_model(): """Build discriminator architecture.""" n_layers, use_sigmoid = 3, False inputs = Input(shape=input_shape_discriminator) x = Conv2D(filters=ndf, kernel_size=(4,4), strides=2, padding='same')(inputs) x = LeakyReLU(0.2)(x) nf_mult, nf_mult_prev = 1, 1 for n in range(n_layers): nf_mult_prev, nf_mult = nf_mult, min(2**n, 8) x = Conv2D(filters=ndf*nf_mult, kernel_size=(4,4), strides=2, padding='same')(x) x = BatchNormalization()(x) x = LeakyReLU(0.2)(x) nf_mult_prev, nf_mult = nf_mult, min(2**n_layers, 8) x = Conv2D(filters=ndf*nf_mult, kernel_size=(4,4), strides=1, padding='same')(x) x = BatchNormalization()(x) x = LeakyReLU(0.2)(x) x = Conv2D(filters=1, kernel_size=(4,4), strides=1, padding='same')(x) if use_sigmoid: x = Activation('sigmoid')(x) x = Flatten()(x) x = Dense(1024, activation='tanh')(x) x = Dense(1, activation='sigmoid')(x) model = Model(inputs=inputs, outputs=x, name='Discriminator') return model判別器架構的 Keras 實現
最後一步是構建完整的模型。本文中這個生成對抗網絡的特殊性在於:其輸入是實際圖像而非噪聲。因此,對於生成器的輸出,我們能得到直接的反饋。
from keras.layers import Inputfrom keras.models import Modeldef generator_containing_discriminator_multiple_outputs(generator, discriminator): inputs = Input(shape=image_shape) generated_images = generator(inputs) outputs = discriminator(generated_images) model = Model(inputs=inputs, outputs=[generated_images, outputs]) return model讓我們一起看看,如何利用兩個損失函數來充分利用這種特殊性。
訓練過程
損失函數
我們在兩個級別提取損失函數:生成器的末尾和整個模型的末尾。
前者是一種知覺損失(perceptual loss),它直接根據生成器的輸出計算而來。這種損失函數確保了 GAN 模型面向一個去模糊任務。它比較了 VGG 第一批卷積的輸出值。
import keras.backend as Kfrom keras.applications.vgg16 import VGG16from keras.models import Modelimage_shape = (256, 256, 3)def perceptual_loss(y_true, y_pred): vgg = VGG16(include_top=False, weights='imagenet', input_shape=image_shape) loss_model = Model(inputs=vgg.input, outputs=vgg.get_layer('block3_conv3').output) loss_model.trainable = False return K.mean(K.square(loss_model(y_true) - loss_model(y_pred)))而後者是對整個模型的輸出執行的 Wasserstein 損失,它取的是兩個圖像差異的均值。這種損失函數可以改善生成對抗網絡的收斂性。
import keras.backend as Kdef wasserstein_loss(y_true, y_pred): return K.mean(y_true*y_pred)訓練過程
第一步是加載數據並初始化所有模型。我們使用我們的自定義函數加載數據集,同時在我們的模型中添加 Adam 優化器。我們通過設置 Keras 的可訓練選項防止判別器進行訓練。
# Load datasetdata = load_images('./images/train', n_images)y_train, x_train = data['B'], data['A']# Initialize modelsg = generator_model()d = discriminator_model()d_on_g = generator_containing_discriminator_multiple_outputs(g, d)# Initialize optimizersg_opt = Adam(lr=1E-4, beta_1=0.9, beta_2=0.999, epsilon=1e-08)d_opt = Adam(lr=1E-4, beta_1=0.9, beta_2=0.999, epsilon=1e-08)d_on_g_opt = Adam(lr=1E-4, beta_1=0.9, beta_2=0.999, epsilon=1e-08)# Compile modelsd.trainable = Trued.compile(optimizer=d_opt, loss=wasserstein_loss)d.trainable = Falseloss = [perceptual_loss, wasserstein_loss]loss_weights = [100, 1]d_on_g.compile(optimizer=d_on_g_opt, loss=loss, loss_weights=loss_weights)d.trainable = True然後,我們啓動 epoch 並將數據集分成不同批量。
for epoch in range(epoch_num): print('epoch: {}/{}'.format(epoch, epoch_num)) print('batches: {}'.format(x_train.shape[0] / batch_size)) # Randomize images into batches permutated_indexes = np.random.permutation(x_train.shape[0]) for index in range(int(x_train.shape[0] / batch_size)): batch_indexes = permutated_indexes[index*batch_size:(index+1)*batch_size] image_blur_batch = x_train[batch_indexes] image_full_batch = y_train[batch_indexes]最後,根據兩種損失,我們先後訓練判別器和生成器。我們用生成器產生虛假輸入,然後訓練判別器來區分虛假輸入和真實輸入,並訓練整個模型。
for epoch in range(epoch_num): for index in range(batches): # [Batch Preparation] # Generate fake inputs generated_images = g.predict(x=image_blur_batch, batch_size=batch_size) # Train multiple times discriminator on real and fake inputs for _ in range(critic_updates): d_loss_real = d.train_on_batch(image_full_batch, output_true_batch) d_loss_fake = d.train_on_batch(generated_images, output_false_batch) d_loss = 0.5 * np.add(d_loss_fake, d_loss_real) d.trainable = False # Train generator only on discriminator's decision and generated images d_on_g_loss = d_on_g.train_on_batch(image_blur_batch, [image_full_batch, output_true_batch]) d.trainable = True你可以參考如下 Github 地址查看完整的循環:
https://www.github.com/raphaelmeudec/deblur-gan
材料
我使用了 Deep Learning AMI(3.0 版本)中的 AWS 實例(p2.xlarge)。它在 GOPRO 數據集上的訓練時間約爲 5 小時(50 個 epoch)。
圖像去模糊結果

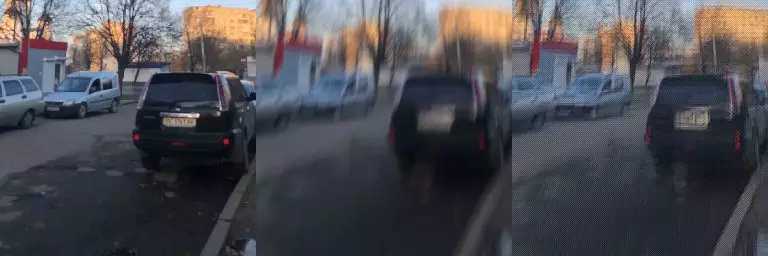
從左到右:原始圖像、模糊圖像、GAN 輸出。
上面的輸出是我們 Keras Deblur GAN 的輸出結果。即使是在模糊不清的情況下,網絡也能夠產生更令人信服的圖像。車燈和樹枝都會更清晰。

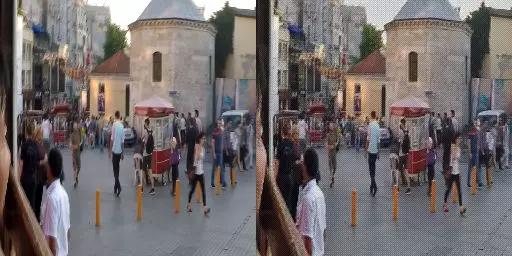
左圖:GOPRO 測試圖片;右圖:GAN 輸出。
其中的一個限制是圖像頂部的噪點圖案,這可能是由於使用 VGG 作爲損失函數引起的。

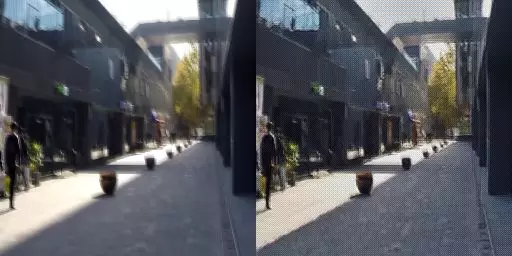
左圖:GOPRO 測試圖片;右圖:GAN 輸出。
希望你在這篇「基於生成對抗網絡進行圖像去模糊」的文章中度過了一段愉快的閱讀時光!

左圖:GOPRO 測試圖片;右圖:GAN 輸出。
論文:DeblurGAN: Blind Motion Deblurring Using Conditional Adversarial Networks

論文地址:https://arxiv.org/pdf/1711.07064.pdf
摘要:我們提出了一種基於有條件 GAN 和內容損失函數的運動去模糊的端到端學習方法——DeblurGAN。在結構相似性測量和視覺外觀方面,DeblurGAN 達到了業內最先進的技術水平。去模糊模型的質量也以一種新穎的方式在現實問題中考量——即對(去)模糊圖像的對象檢測。該方法比目前最佳的競爭對手速度提升了 5 倍。另外,我們提出了一種從清晰圖像合成運動模糊圖像的新方法,它可以實現真實數據集的增強。
模型、訓練代碼和數據集都可以在以下地址獲得:https://github.com/KupynOrest/DeblurGAN。
原文鏈接:https://blog.sicara.com/keras-generative-adversarial-networks-image-deblurring-45e3ab6977b5